

How to Set Up L2TP VPN on Mikrotik Router
Before you begin, make sure:
- Your Mikrotik router is connected to the internet.
- You have an active ZoogVPN subscription.
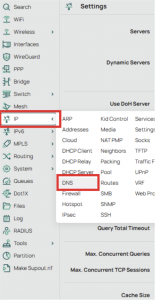
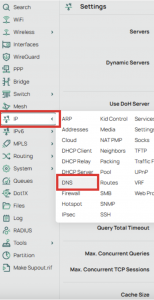
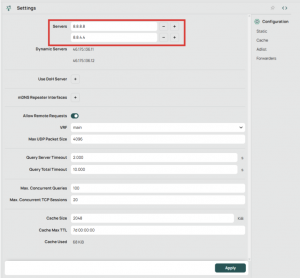
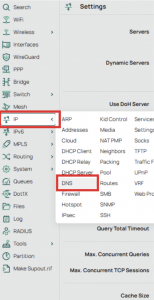
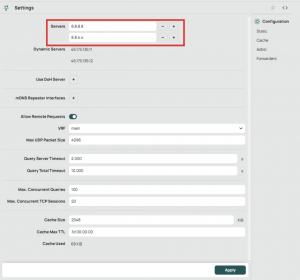
- To avoid DNS leaks, set static DNS servers:
- 8.8.8.8
- 8.8.4.4
You can manage these here:

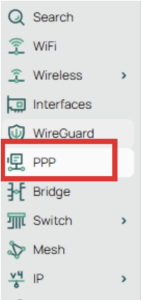
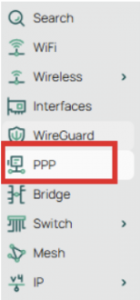
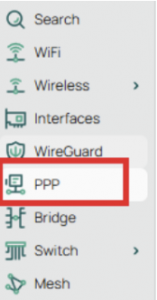
Step 1 – Open the PPP interface
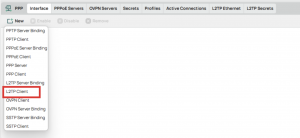
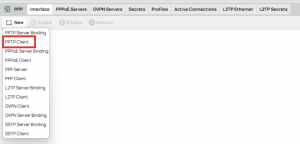
- Go to the Mikrotik interface and open the PPP tab.
- In the new window, you will be able to select the appropriate protocol.
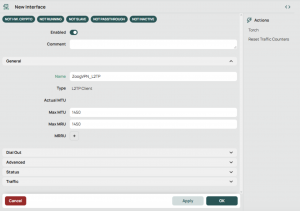
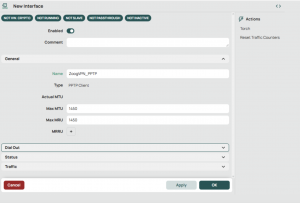
- In the opened window, set a Name in the General tab, for example: ZoogVPN_L2TP.
Step 2 – Dial Out Tab
- Go to the Dial Out tab.
- In the Connect To field, enter the server address you want to connect to, such as nl.zgfree.info or de1.webunlim.com.
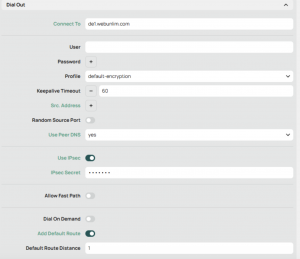 (The server IP/address can be taken from your ZoogVPN account in the “Server location” section of the “Address” column)
- Enter your ZoogVPN username and password in the corresponding fields.
- Check the box Use IPsec and enter the IPsec secret: ZoogVPN
- Make sure the Profile is set to default-encryption.
- Enable the following options if available:
- Add Default Route
- Use Peer DNS
Leave the other settings at their default values unless instructed otherwise. Make sure the authentication methods mschap2 and mschap1 are allowed.
Step 4 – Apply and Save
Click Apply, then OK to save your connection.
That’s it! You’ve successfully configured L2TP VPN on your Mikrotik router. Your connection is now secure and encrypted.
If you encounter any issues, don’t hesitate to reach out to our support team. You can also follow us on Facebook and Twitter for news and updates.
How to Set Up PPTP VPN on Mikrotik Router
Note: PPTP is an outdated VPN protocol; we recommend using L2TP or OpenVPN whenever possible. Use PPTP only if other protocols are not supported on your device.
Before You Start
Make sure:
- Your Mikrotik router is connected to the internet.
- You have an active ZoogVPN subscription.
- To avoid DNS leaks, set static DNS servers:
- 8.8.8.8
- 8.8.4.4
You can manage these here:
Step 1 – Open the PPP Interface
- Navigate to this section
- In the new window, you will be able to select the appropriate protocol.
- In the opened window, set a Name in the General tab, for example: ZoogVPN_PPTP.
Step 2 – Dial Out Tab
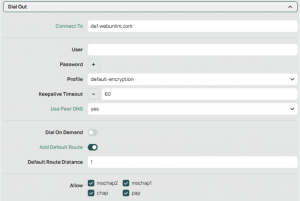
- Go to the Dial Out tab.
- In the Connect To field, enter the server address you want to connect to, such as nl.zgfree.info or de1.webunlim.com.
 (The server IP/address can be taken from your ZoogVPN account in the “Server location” section of the “Address” column)
 - Enter your ZoogVPN username and password in the corresponding fields.
- Make sure the Profile is set to default-encryption.
Leave the other settings at their default values unless instructed otherwise.
Step 3 – Apply and Save
Click Apply, then OK to save the configuration.
You are now connected to ZoogVPN using PPTP protocol.
Enjoy safe and private browsing.
If you need help, contact our customer support. Follow us on Facebook and Twitter for news and updates.
How to Set Up OpenVPN (OVPN) on Mikrotik Router
Before starting, make sure:
- Your Mikrotik router is connected to the internet.
- You have an active ZoogVPN subscription.
Note: TLS authentication support is available starting from RouterOS version 7.17. To get a compatible configuration file for your MikroTik router, please contact our support team.
Step 1 – Import ZoogVPN certificate
- To set it up, you’ll need to import .ovpn config file.
- Download the file from your ZoogVPN dashboard or contact our support if you need help.
Step 2 – Open the PPP interface
- Open the PPP tab.
- In the new window you need to select “import .ovpn”.

- In the opened window you need to select the appropriate file in the “File Name” field and then click “Start”
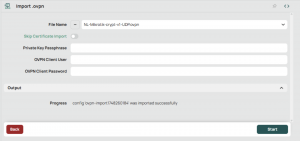
- Once successfully added, go to the PPP section again and navigate to the added configuration
In the opened window, set a Name in the General tab, for example: ZoogVPN_OVPN.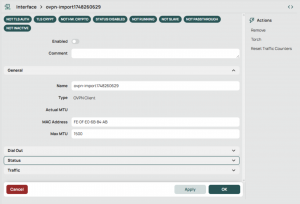
Step 3 – Dial Out Tab
Go to the Dial Out tab and select Add default router
- In Connect To, enter the server address
- Enter your ZoogVPN username and password
- Set Profile to default.
- In Certificate, choose the one you imported.
- Auth. will be set to sha1 and Cipher to blowfish128 or aes128 automatically when the .ovpn file is imported.
- Enable Add Default Router.
Leave the other settings at their default values unless instructed otherwise.
Step 4 – Apply and Save
Click Apply, then OK to save your connection.
You’re all done! You’ve successfully configured OpenVPN on your Mikrotik router. Your internet traffic is now routed through a secure and encrypted tunnel.
If you run into any trouble or need assistance, our support team is here to help. Don’t forget to follow us on Facebook and Twitter for the latest updates, tips, and service news.
How to Set Up WireGuard VPN on Mikrotik Router
WireGuard is a modern, fast, and secure VPN protocol. It’s recommended over PPTP and L2TP for better performance and security. Before starting, make sure:
- Your Mikrotik router is connected to the internet.
- You have an active ZoogVPN subscription.
- To avoid DNS leaks, set static DNS servers:
- 8.8.8.8
- 8.8.4.4
You can manage these here:
Step 1 – Import WireGuard Configuration from ZoogVPN
- Upload a configuration file.
- The configuration files for WireGuard will be available after contacting Support.
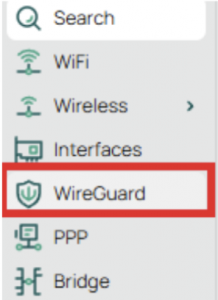
Step 2 – Open WireGuard and Import Configuration
- Navigate to the WireGuard menu.
- In the new window you need to select “WG import”.
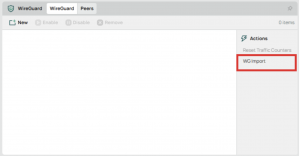
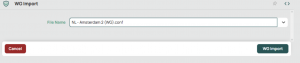
- In the opened window you need to select the appropriate file in the “File Name” field and then click “WG import”
- Once successfully added, go to the WireGuard section again and navigate to the added configuration
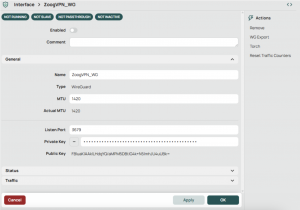
- In the opened window, set a Name in the General tab, for example: ZoogVPN_WG.
Step 3 – Route All Traffic Through WireGuard
Go to the console(terminal) and type:
/ip route add dst-address=0.0.0.0/0 gateway=ZoogVPN_WG
(or specify your name instead of “ZoogVPN_WG” which you specify).
This is to route all traffic through this protocol.
Press “Enter” 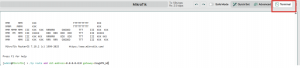
Step 4 – Final Check and Save Configuration
- Make sure the WireGuard interface is active and connected.
- Check your public IP to confirm the VPN is working correctly.
That’s it! You’ve successfully configured WG VPN on your Mikrotik router. Your connection is now secure and encrypted.
If you encounter any issues, don’t hesitate to reach out to our support team. You can also follow us on Facebook and Twitter for news and updates.
How to Set Up ZoogVPN on MikroTik Using OpenVPN Certificates (.crt)
This guide walks you through configuring ZoogVPN on your MikroTik router using certificate-based OpenVPN setup via Winbox.
Step 1 – Download the Certificate File (.crt)
- Go to the ZoogVPN configuration page:
https://app.zooog.info/setup/downloads - Log in to your ZoogVPN account if prompted.
- Find the VPN Setup & Downloads section.
- Download the required .crt file and save it to your computer.
Step 2 – Access the Router via Winbox
- Open the Winbox application on your PC.
- If you don’t have Winbox, download it from the official MikroTik site:
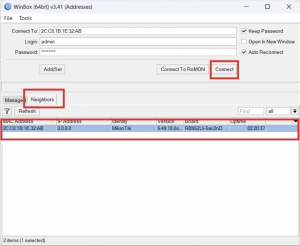
https://mikrotik.com/download - In Winbox, go to the Neighbors tab.
- Select your router from the list and click Connect.
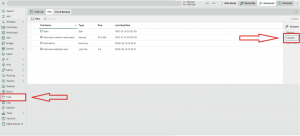
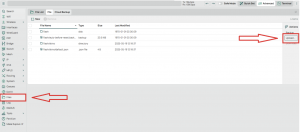
Step 3 – Upload the Certificate File (.crt)
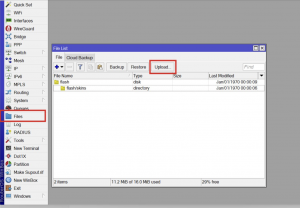
- Click on the Files tab in the left-hand menu.
- In the File List window, click Upload….
- Locate and open your .crt file using File Explorer. Alternatively, you can drag and drop the file into the File List window.
-
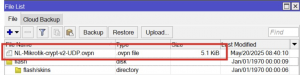
Confirm that your certificate file appears in the list.
Note: The file name may vary, but it must have a .crt extension.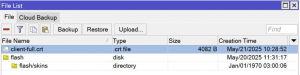
Step 4 – Import the Certificate
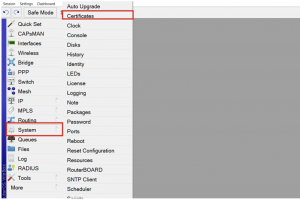
- Go to System in the left menu and select Certificates.
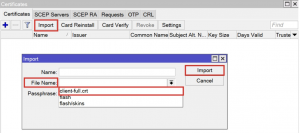
- In the Certificates window, click Import.
- In the import dialog:
- Select the .crt file from the File Name drop-down.
- Click Import.
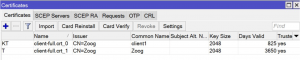
- Once imported successfully, you should see two certificates listed in the Certificates window. It’s important that:
- There are two certificates.
- The KT and T flags are present.
Step 5 – Create the OpenVPN Client Interface
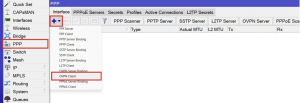
- Open the PPP tab.
- Click the “+” button and choose OVPN Client.
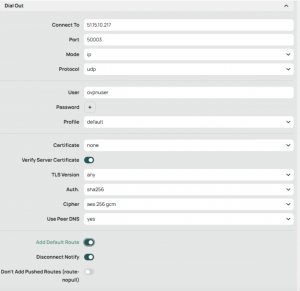
- In the Dial Out tab, fill in the following fields:
-
- Connect To: nl7.webunlim.com
(Note: server address may vary – confirm with support if needed)
Port: 50005
(Note: port may vary – confirm with support) - User: ovpn
- Certificate: Select the first certificate from the drop-down menu
- Auth.: sha1
- Cipher: aes256
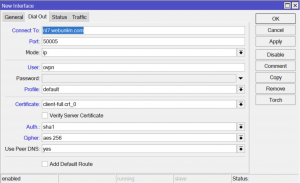
- Connect To: nl7.webunlim.com
In the General tab (optional):
- Change the interface Name from ovpn-out1 to something descriptive like ZoogVPN for easier identification.

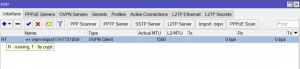
Final Step – Verify the Connection
- After completing the setup and clicking OK, return to the PPP tab.
- The newly created interface should display the Status as Running.
This means your MikroTik router is successfully connected to ZoogVPN.
If you need help or your status is not showing as “Running”, please contact our support team at [email protected] or visit the Help Center.
Let ZoogVPN keep your network secure with full router-level protection.
How to Set Up ZoogVPN on MikroTik Using OpenVPN (.ovpn File)
This guide explains how to set up ZoogVPN on MikroTik routers running RouterOS v7.16 or earlier using a standard .ovpn configuration file. Note that these versions do not support tls-auth or tls-crypt directives, which are required by our latest configuration files.
Please contact our support team at [email protected] and request the OpenVPN configuration file for MikroTik. Our team will provide you with the correct version tailored to your router’s requirements.
Once you receive the file, save it to your computer – you’ll need it in the next step.
Step 1 – Access Your MikroTik Router via Winbox
- Launch Winbox on your PC.
- If you do not have Winbox installed, download it from the official MikroTik website:
https://mikrotik.com/download - Go to the Neighbors tab.
- Select your router from the list and click Connect.

Step 2 – Upload the .ovpn File
- Click on the Files tab in the left-hand menu.
- In the File List window, click Upload….
- Use File Explorer to locate your .ovpn file and click Open.
Alternatively, you can drag and drop the file directly into the File List window.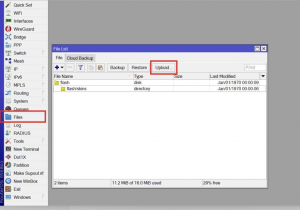
- Confirm that the file appears in the list.
Step 3 – Import the .ovpn File via PPP Tab
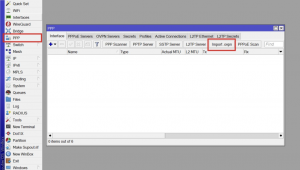
- Open the PPP tab in the left-hand menu.
- Click on Import .ovpn.
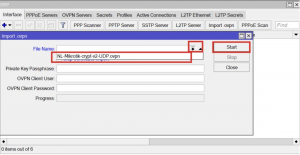
- In the import window:
- Select the uploaded .ovpn file from the drop-down list.
- Click Start.
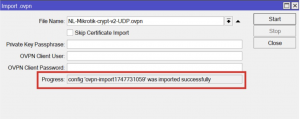
- Once the message confirming successful import appears, close the import window.
- Find the PPP tab in the interface and press “Import .ovpn”
Step 4 – Enable the VPN Connection
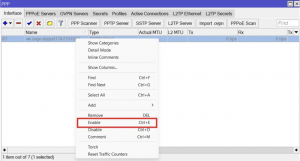
- Return to the PPP tab.
- Locate the imported ZoogVPN profile in the list.
- Right-click on it and select Enable.
- The Status should display Running, indicating that the VPN connection is active.
If you encounter any issues or need further assistance, please contact our support team at [email protected] or visit our Help Center.
Let ZoogVPN protect your network with ease and reliability.


